%20--%3e%3csvg%20width='32.035282mm'%20height='27.467051mm'%20viewBox='0%200%2032.035282%2027.467051'%20version='1.1'%20id='svg1'%20inkscape:version='1.3%20(0e150ed6c4,%202023-07-21)'%20sodipodi:docname='_Logo%20Whit%20D%20only.svg'%20xmlns:inkscape='http://www.inkscape.org/namespaces/inkscape'%20xmlns:sodipodi='http://sodipodi.sourceforge.net/DTD/sodipodi-0.dtd'%20xmlns='http://www.w3.org/2000/svg'%20xmlns:svg='http://www.w3.org/2000/svg'%3e%3csodipodi:namedview%20id='namedview1'%20pagecolor='%23ffffff'%20bordercolor='%23000000'%20borderopacity='0.25'%20inkscape:showpageshadow='2'%20inkscape:pageopacity='0.0'%20inkscape:pagecheckerboard='0'%20inkscape:deskcolor='%23d1d1d1'%20inkscape:document-units='mm'%20inkscape:zoom='1.1180205'%20inkscape:cx='144.45173'%20inkscape:cy='118.51303'%20inkscape:window-width='2400'%20inkscape:window-height='1511'%20inkscape:window-x='-9'%20inkscape:window-y='-9'%20inkscape:window-maximized='1'%20inkscape:current-layer='layer1'%20/%3e%3cdefs%20id='defs1'%20/%3e%3cg%20inkscape:label='Layer%201'%20inkscape:groupmode='layer'%20id='layer1'%20transform='translate(-66.675,-117.21042)'%3e%3cpath%20id='path103'%20style='fill:%23ffffff;stroke-width:2.99999;stroke-linecap:round;stroke-linejoin:round;stroke-dashoffset:22.2237'%20d='m%2075.821471,117.75406%20v%208.61239%20h%208.606141%20a%200.5493721,0.5493721%200%200%200%200.549372,-0.54938%20v%20-4.43926%20a%200.21027282,0.21027282%200%200%201%200.358425,-0.14922%20l%204.713617,4.68%204.583603,4.55091%20a%200.68269965,0.68269965%200%200%201%202.5e-5,0.96891%20l%20-4.583628,4.5514%20-4.735,4.70075%20a%200.19773269,0.19773269%200%200%201%20-0.337042,-0.14032%20v%20-4.51188%20a%200.5063983,0.5063983%200%200%200%20-0.506398,-0.5064%20h%20-8.649115%20v%208.46314%20a%200.69237693,0.69237693%200%200%200%200.692377,0.69237%20h%208.463136%20c%204.906435,-6e-5%209.44014,-2.61765%2011.893331,-6.86676%202.45329,-4.24916%202.45329,-9.48437%200,-13.73353%20-2.453191,-4.24911%20-6.986896,-6.8667%20-11.893331,-6.86676%20h%20-8.611867%20a%200.54364572,0.54364572%200%200%200%20-0.543646,0.54364%20z%20m%200,17.7679%20v%20-9.15551%20c%20-4.911867,-2.4e-4%20-8.920479,3.86752%20-9.146021,8.72362%20-0.01107,0.23833%200.183429,0.43189%200.422049,0.43189%20z'%20/%3e%3c/g%3e%3c/svg%3e)
What we will build
There are a few pieces to this puzzle, and while I initially said this would be a 100% low-code solution, that might not technically be true. We’ll need a tiny bit of JavaScript. But don’t worry! It's just a small script to open the app with context.
Technically, you can navigate to custom pages with Power Fx, but you can’t pass context—meaning information about the record you’re navigating from. Without that, Custom Pages aren’t very useful for our purposes. So, enough talk! Here's an overview:
- A Custom Page
- The JavaScript
- Configure the Command Bar Button
- Add the Custom Page to our App!
This is the foundation of every Custom Page you'll build. It’s not too bad, right?
Step 1) Creating the Custom Page
For this demonstration, we’ll create a Custom Page that links contacts to an account via a custom Many-to-Many relationship table. This is common in Dataverse solutions, and I’m using it as an example because everyone has access to these two tables, no matter the environment.
Here’s how you do it step-by-step:
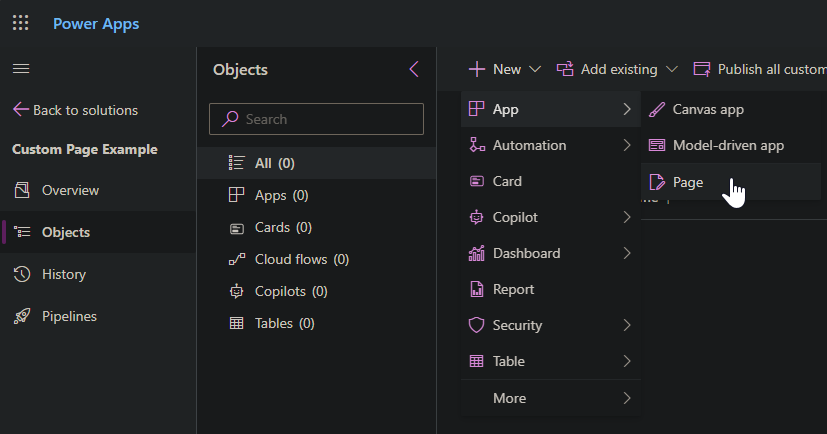
- Go to Power Apps and open the solution you want to create the Custom Page in. I recommend this method over creating it inside the model-driven app. Otherwise, it might end up in the default solution with the wrong prefix.
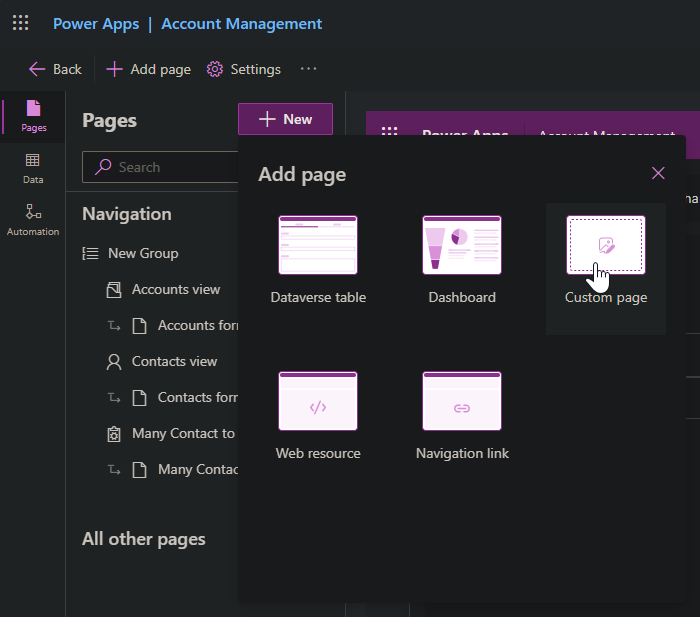
- Add the Custom Page.
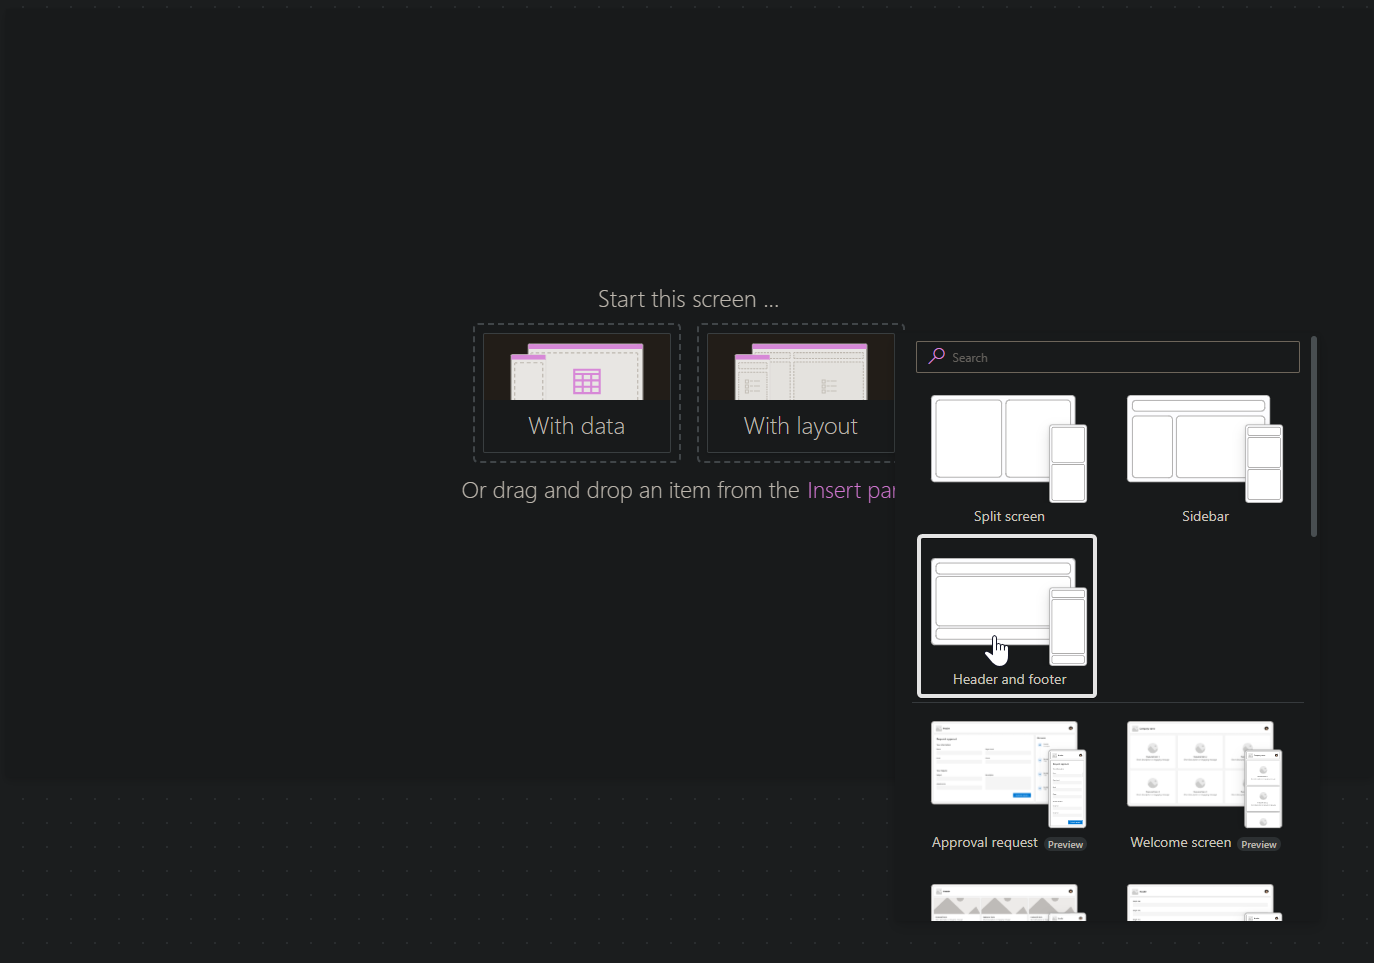
- Select your layout. I usually go with the Header and Footer template because it’s responsive, but it’s up to you.
- Quickly add a label and give it some content.
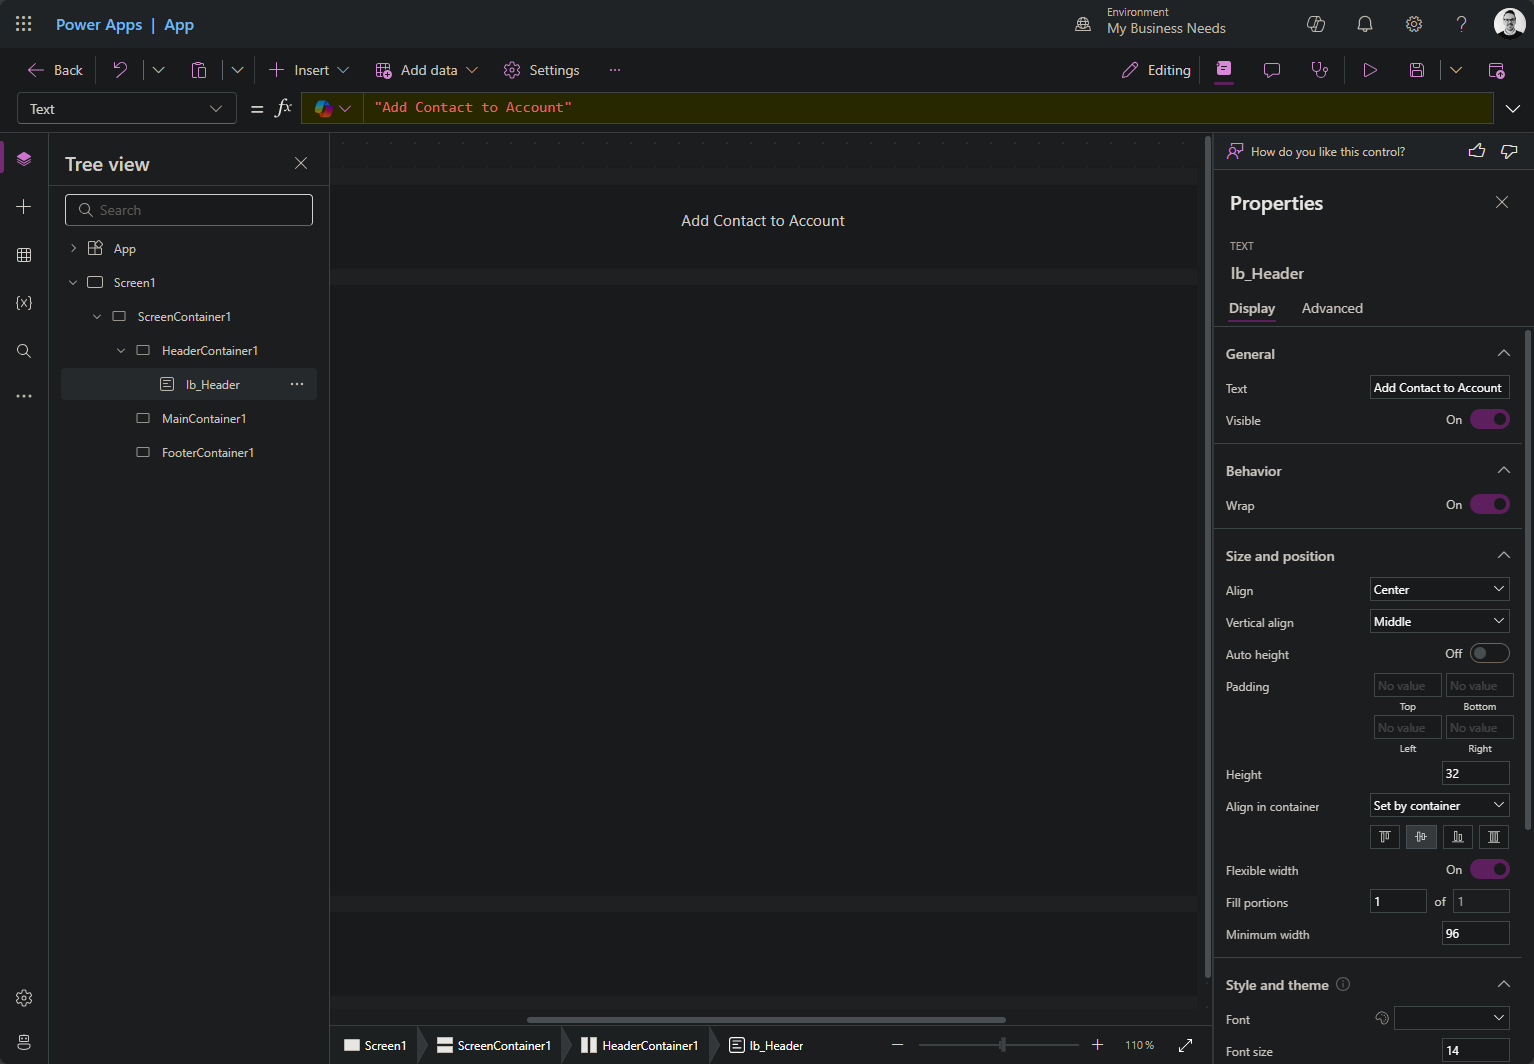
- Give the app a name. I named mine “Add Contact Many to Many.”
- Add a bit of styling to the label as shown:
At this point, we have enough to move on. Don’t worry about making it look beautiful just yet—we’ll come back to it after all the steps are working together.
Step 2) Create the JavaScript
Now, things can get a little tricky here if you’re not careful. I’ll walk you through the simplest version of the script, but you can extend it for more advanced functionality.
The first thing you need is the app name. Since Microsoft doesn’t display it in a way that’s easy to copy, I use developer tools (Ctrl + Shift + I) to get the app name from the solution component list.
My app is named dkp_addcontactmanytomany_be4fd.
function openCustomPageAddContactToAccount(formContext) {
var pageInput = {
pageType: "custom",
name: "ADD_APP_NAME_HERE",
//entityName: "account",
recordId: formContext.data.entity.getId().replace(/[{}]/g, ""),
};
var navigationOptions = {
target: 2,
position: 2,
width: { value: 500, unit: "px" },
};
Xrm.Navigation.navigateTo(pageInput, navigationOptions)
.then(function () {
// Called when page opens
})
.catch(function (error) {
// Handle error
});
}
Here’s where you might get tripped up: formContext. This will vary depending on how we set up the Command Bar button. If formContext is mentioned, it means we have access to the UI API, so the recordId formula will work if we configure the button correctly.
A couple of notes on parameters:
- target: 1 = full-page, no position; 2 = side dialog (this is what we’ll use).
- position: 1 = center dialog; 2 = side dialog.
- width: You can hardcode the width like
{ value: 500, unit: "px" }or make it responsive like{ value: 50, unit: "%" }.
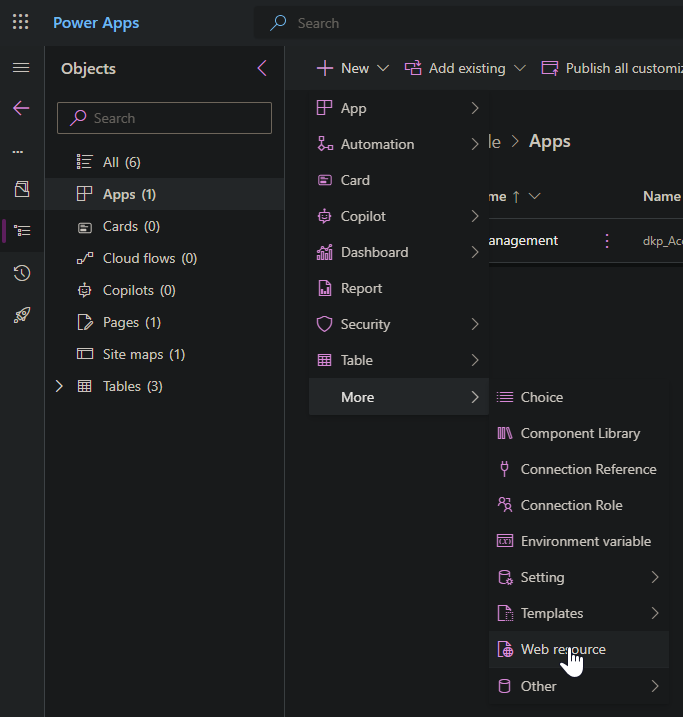
Copy the code into your favorite text editor and save it as custom-custom-pages-library.js. Now, upload it to your solution as a Web Resource.
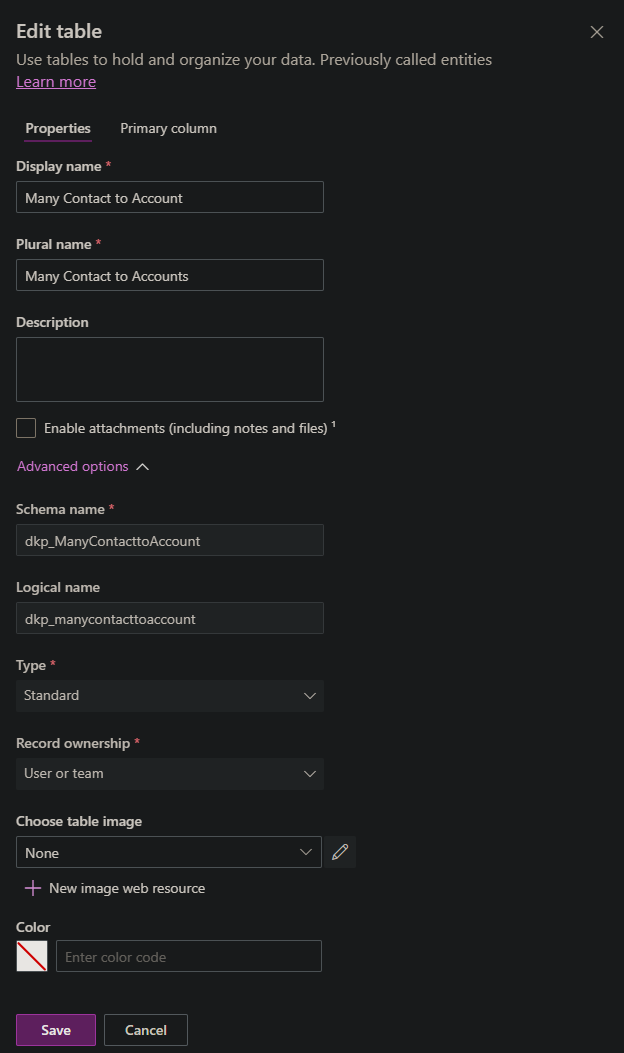
Step 3) Add a table for the relationship
I’m assuming you know how this works, so I’ll just show a few images of my setup:
The Table:
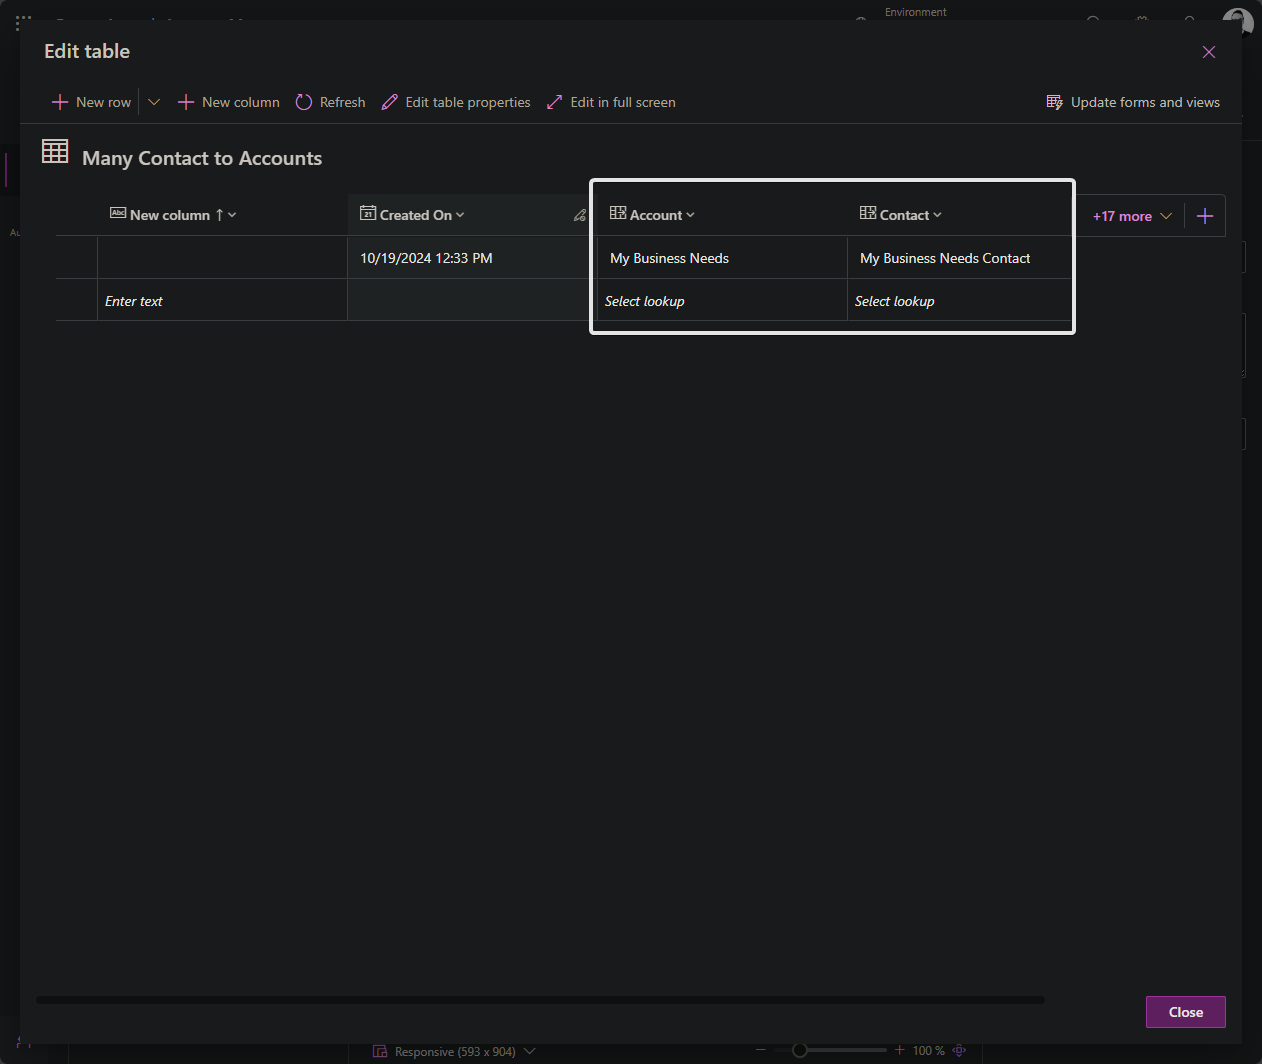
The Columns I added:
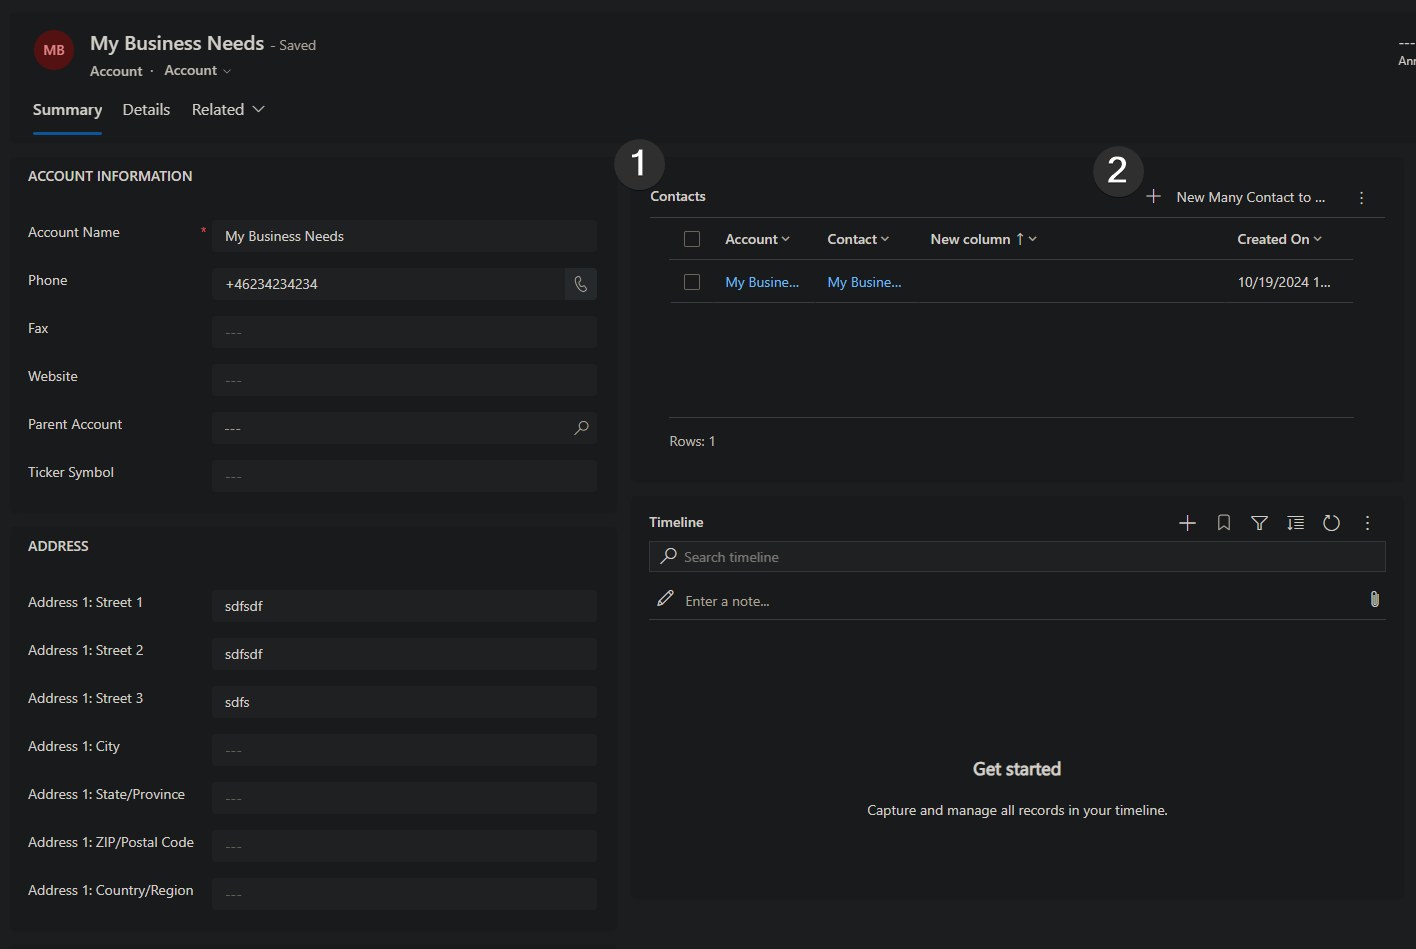
The Model-Driven app with the Subgrid added to accounts:
Step 4) Adding the button to the form
With the JavaScript uploaded, it’s time to configure the button. You can either do this from the app (scoped to the app) or from the solution on the table (makes the button global). I recommend the app option—no point in having access to a button if you don’t have access to the Custom Page.
- Open the Model-Driven App.
- Navigate to the table where you want to add the button.
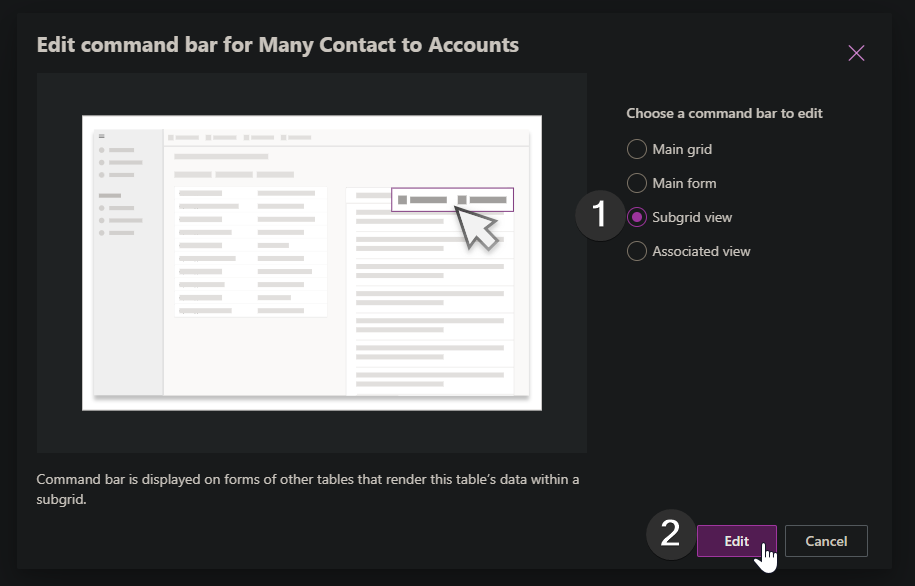
- Press the three ellipses and select Edit Command Bar.

Select the Subgrid view when prompted.
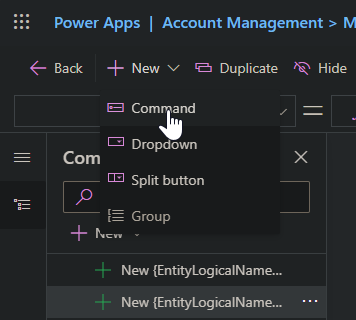
If it’s your first time, you’ll be asked if this is a JavaScript or Power Fx button. Choose JavaScript.
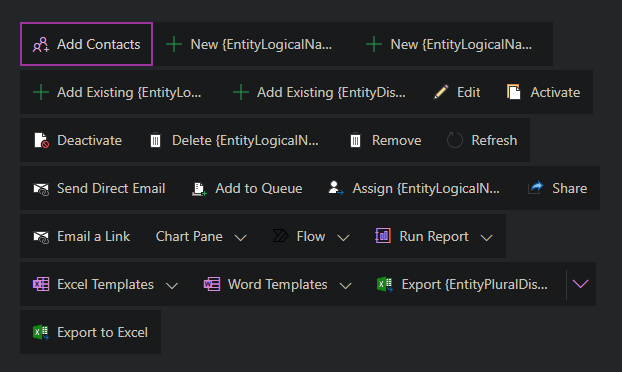
Add a new command from the top: New > Command.
Reorder the button in the visual editor to place it where it makes sense. I’m moving mine to the start.
Make a few configurations:
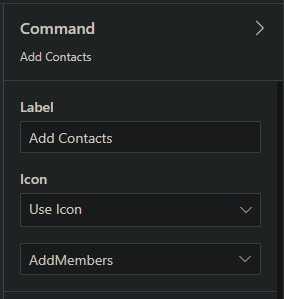
Add the JavaScript library we uploaded.
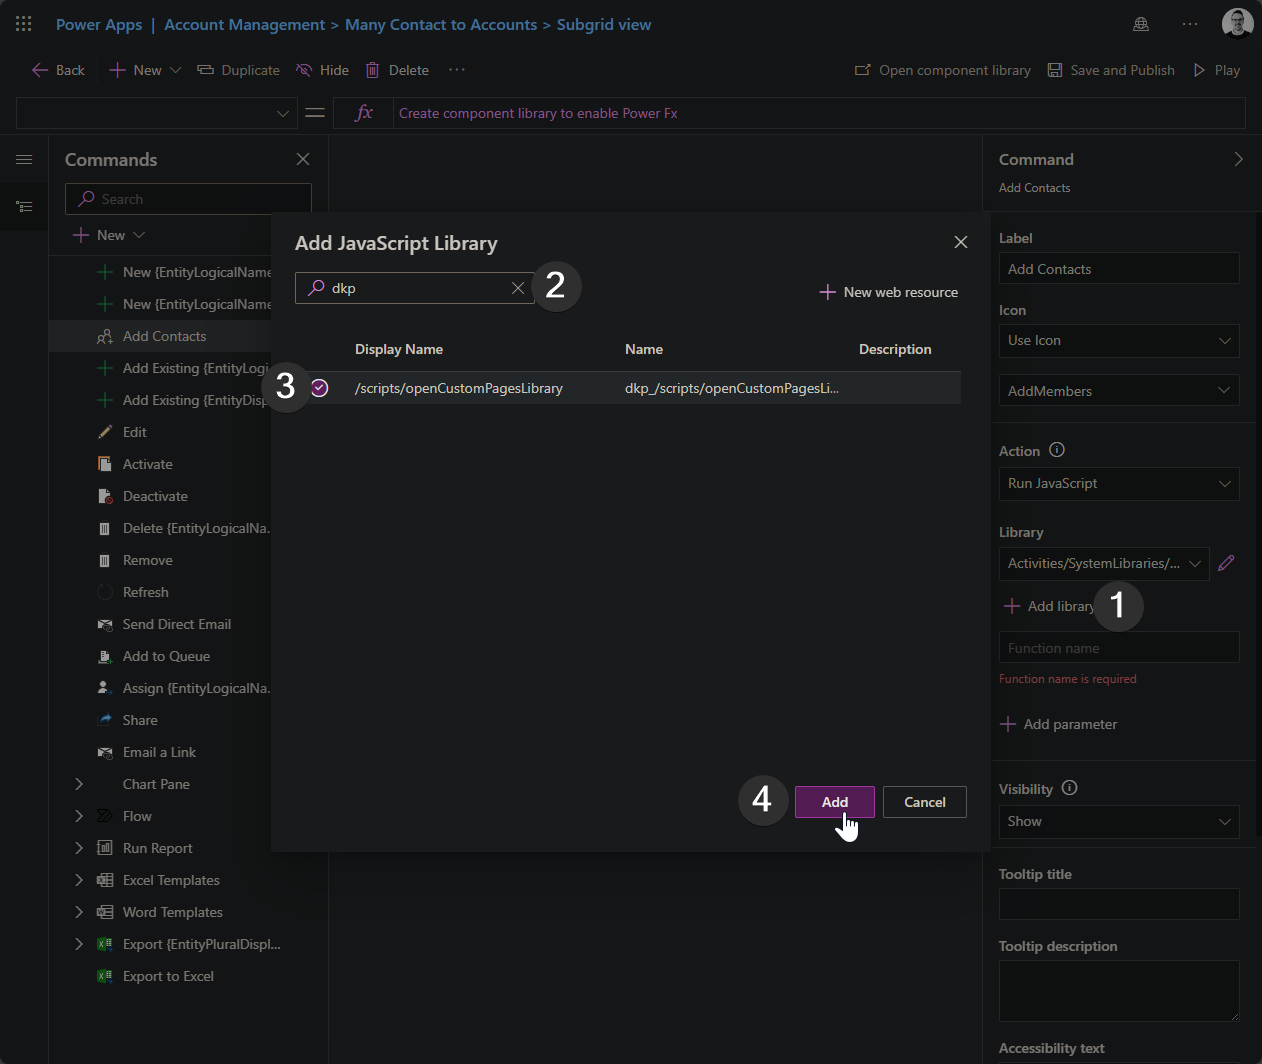
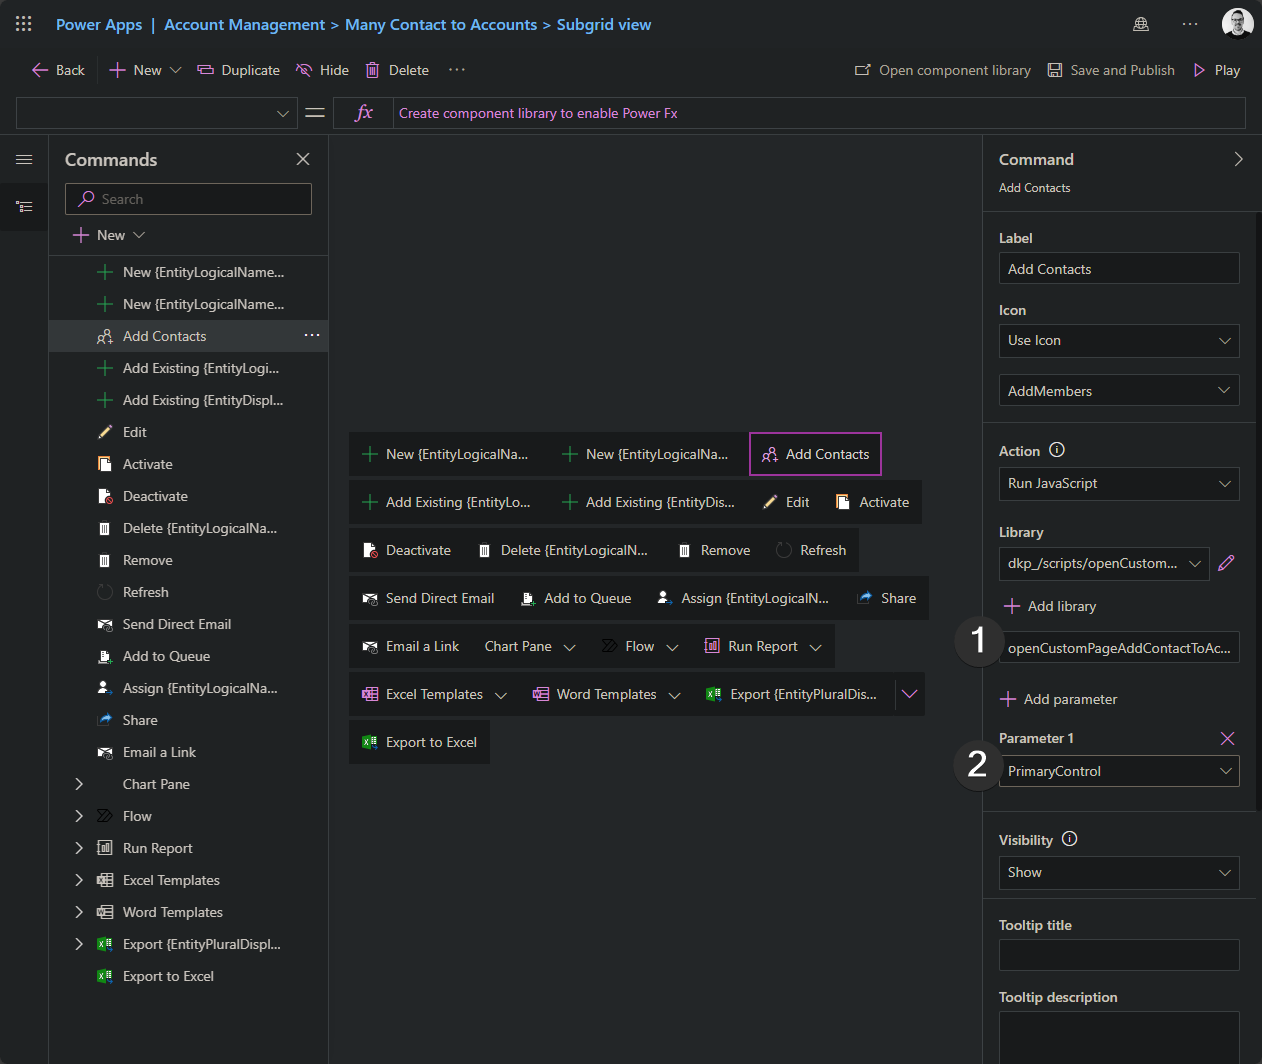
Refer to the function openCustomPageAddContactToAccount and add the parameter in the correct order.
Step 5) Adding the Custom Page to the App
This is the easiest step, but it’s also the easiest to forget—and trust me, you’ll regret it if you do.
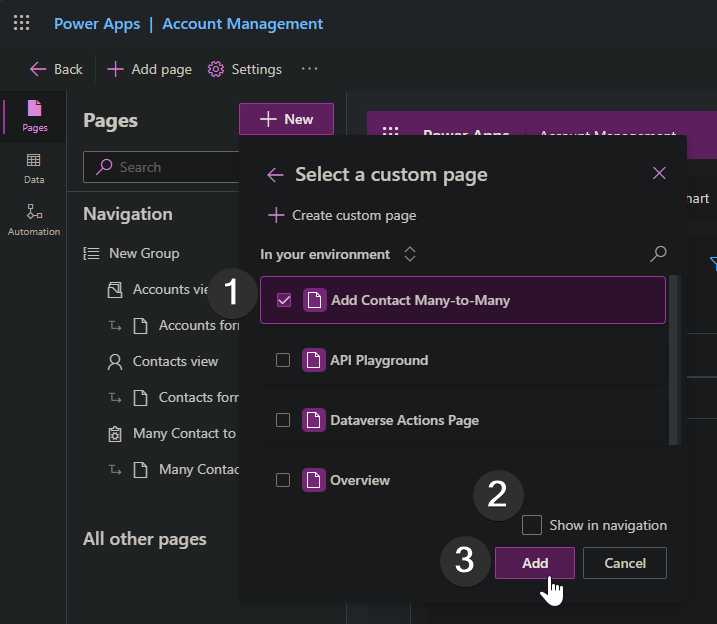
Go to the app in edit mode and add the page:
Since the page will be accessed via the button, we don’t want it in the navigation:
Publish the app and test everything. If you don’t see changes, try refreshing with Ctrl + R or Ctrl + F5.

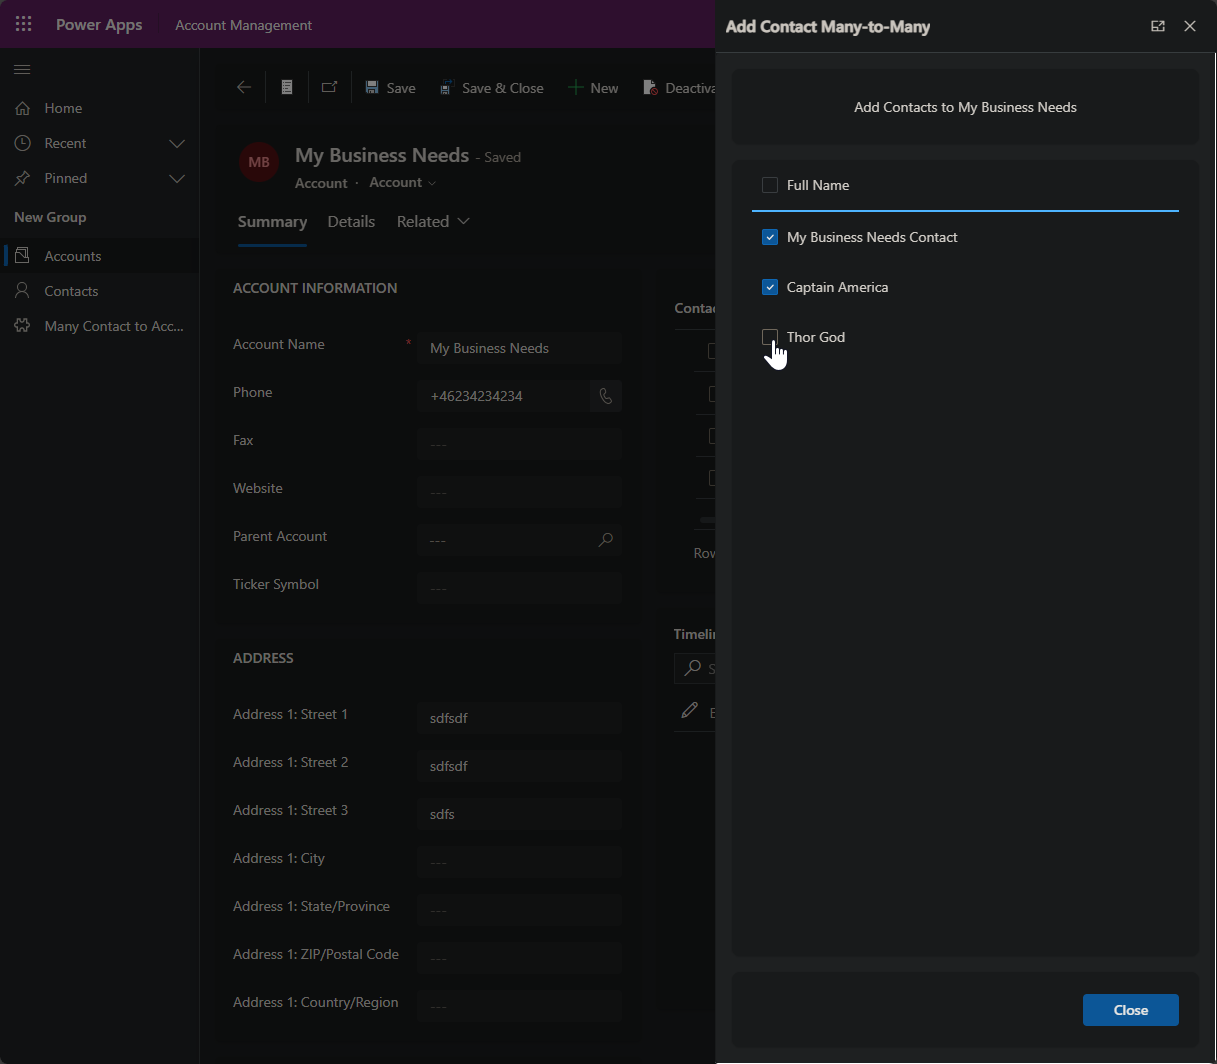
Boom! You’ve got a Custom Page triggered as a Quick Create form, but you have full control!
Step 6) Fix the Custom Page to Do Stuff
Now, let’s make the app do something! Head back into the Custom Page and add the data sources: Account, Contact, and the custom Many Contact to Accounts table.
Next, set up the App OnStart to handle the recordId parameter so we can look up the account dynamically. Copy this Power Fx code:
If(
IsBlank(Param("recordId")),
Set(
varSelectedRecord,
LookUp(
Accounts,
Account = GUID("a8eab721-ae0b-ef11-9f89-002248995ba0")
)
),
Set(
varSelectedRecord,
LookUp(
Accounts,
Account = GUID(Param("recordId"))
)
)
)
This function checks if recordId is missing or blank. If it is, we assume we’re in edit mode and use a hardcoded GUID. Otherwise, we look up the account we were on when we opened the Custom Page.
Run the App OnStart function to trigger it.
Now, use the varSelectedRecord in the label we added at the beginning. Set the label's text property to this:
$"Add Contacts to {varSelectedRecord.'Account Name'}"
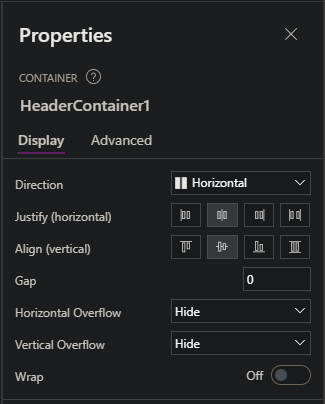
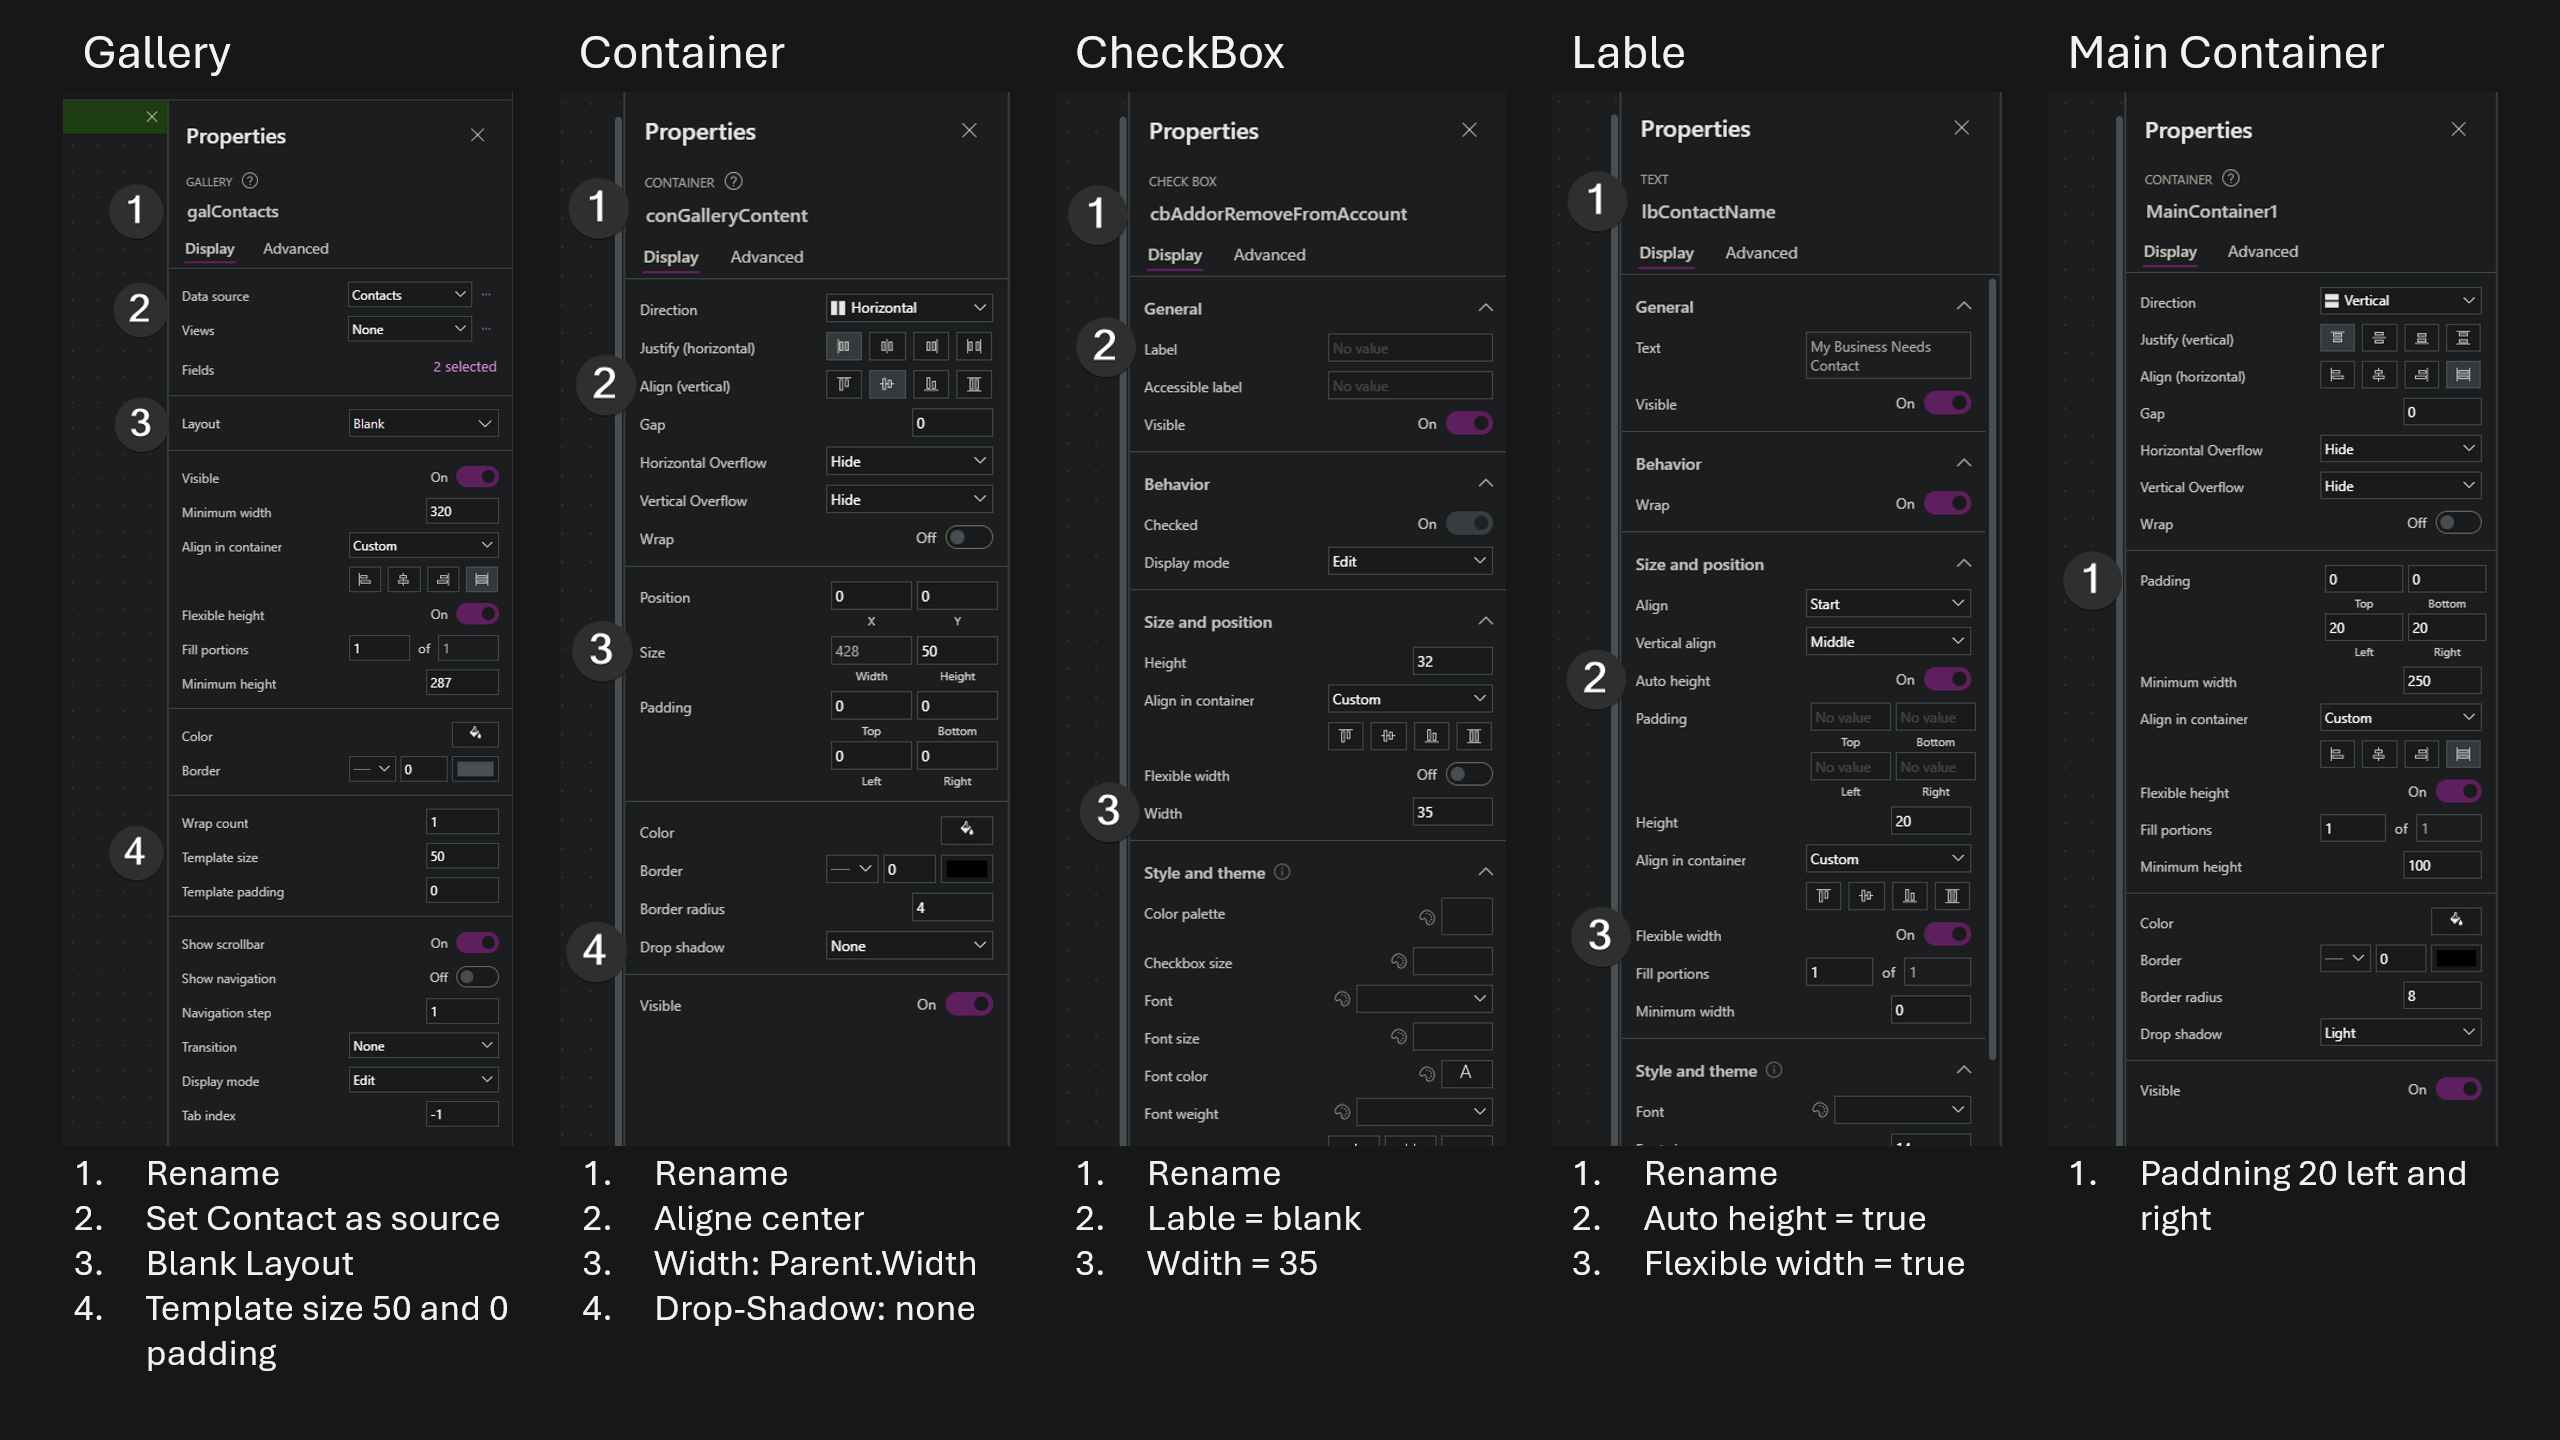
Next, build the app as follows:

Add a Horizontal Container for the header, a label with the text "Full Name," and a 2px high rectangle for the divider.
Add a Blank Vertical Gallery that connects to Contacts, set Template height to 50px, and remove template padding.
Inside the gallery template, add a CheckBox and set its width to 35px. Add a label with the text property ThisItem.'Full Name'.
Finally, add a "Close" button to the footer. Set the button text to "Close" and OnSelect: Back(). This will simply close the Custom Page for us.
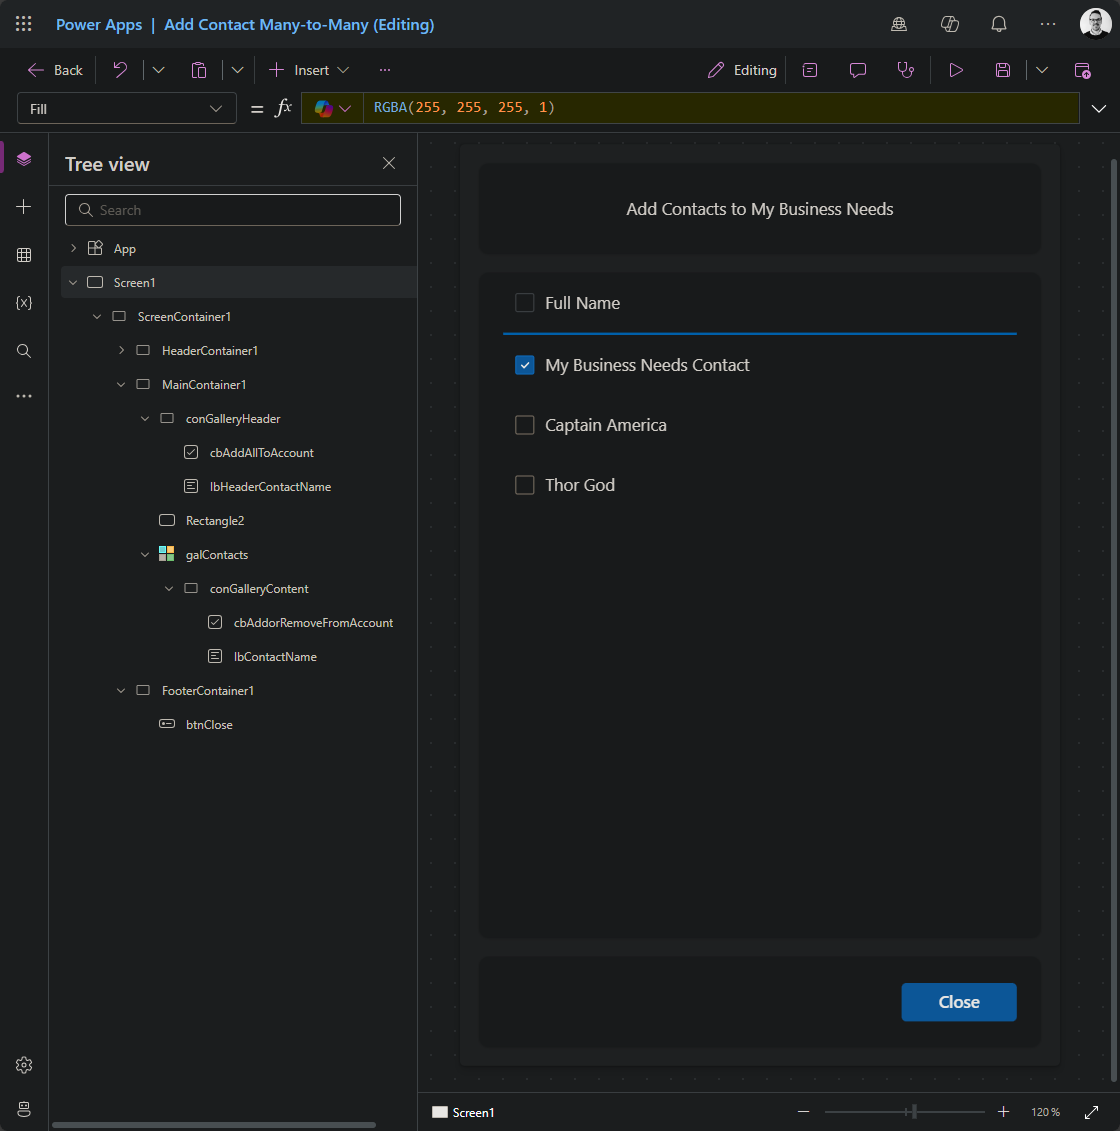
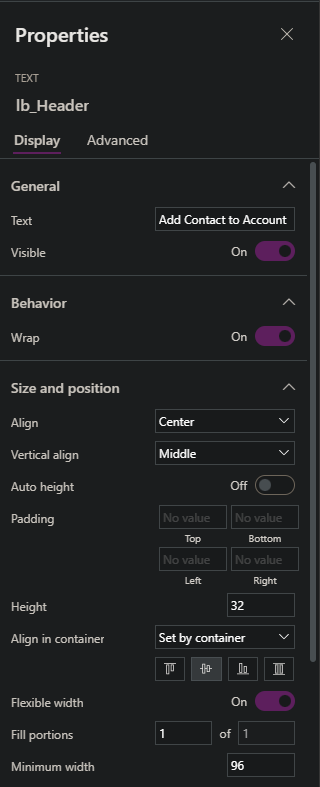
Here is most of the properties in one image:
Now we have all the components that we need, we just need logic. Most of the heavy lifting, in this case, will be done by the CheckBox. We just need a little help from the OnVisible property of Screen1.
The OnVisible property is used to make the Checked or Unchecked default state work for the CheckBox. We will simply add a ClearCollect function, which will find all the contacts this Account already has a relationship with.
Add this function:
ClearCollect(
colManyToMany,
Filter(
'Many Contact to Accounts',
Account.Account = varSelectedRecord.Account
)
)
Functions for the CheckBox:
OnCheck:
//Add the record to the data source
Patch(
'Many Contact to Accounts',
Defaults('Many Contact to Accounts'),
{
Account: varSelectedRecord,
Contact: ThisItem
}
);
//Add the record to the local collection
Patch(
colManyToMany,
Defaults(colManyToMany),
{
Account: varSelectedRecord,
Contact: ThisItem
}
)
OnUncheck:
//Removes the record from the data source
Remove(
'Many Contact to Accounts',
LookUp(
'Many Contact to Accounts',
Account.Account = varSelectedRecord.Account && Contact.Contact = ThisItem.Contact
)
);
//Removes the record from a local collection called colManyToMany
Remove(
colManyToMany,
LookUp(
colManyToMany,
Account.Account = varSelectedRecord.Account && Contact.Contact = ThisItem.Contact
)
)
Checked:
!IsBlank(LookUp(colManyToMany, Contact.Contact = ThisItem.Contact))
That's all we needed. Here is a quick walkthrough of all the main areas you need to add the functions,
Let's publish and admire our beautiful work!
The Product
Now, we can see how blazingly fast we can add a bunch of contacts to an account. And this is just a simple example of what this is capable of!